How to photograph the night sky and get amazing long exposure star pictures – even if it’s cloudy.
This past presidents day weekend, I was able to rent two lenses for my Nikon Full-Frame D600. I have already used Nikon’s 70-200mm f/2.8 lens before, but I was most excited to try out Rokinon’s Ultra Wide Angle 14mm f/2.8. Rexburg, Idaho is located one hour west of the Teton Mountain range so our weather is beyond bipolar, it’s straight up strange, which isn’t the best for photographing the stars with night sky photography.
Most people would think that in order to get an awesome night sky photograph, the weather conditions have to be clear. Based upon your personal style, this might be true, but when it comes to night sky photography, I love being able to see the wispiness of the clouds – a natural bi-product of long exposure and night sky photography. However, what I didn’t know was if the clouds are thin enough, you can see through and get stars, like this beautiful night sky photography below!
LESSON 1: BALANCING THE LIGHT
Key Tip: If you take a night sky photograph and it’s too bright, always start by dropping down your ISO as you will end up with a less noisy image. If it’s still too bright, decrease your aperture (choose a higher f/number). Also, if the moon is out start with ISO 100.
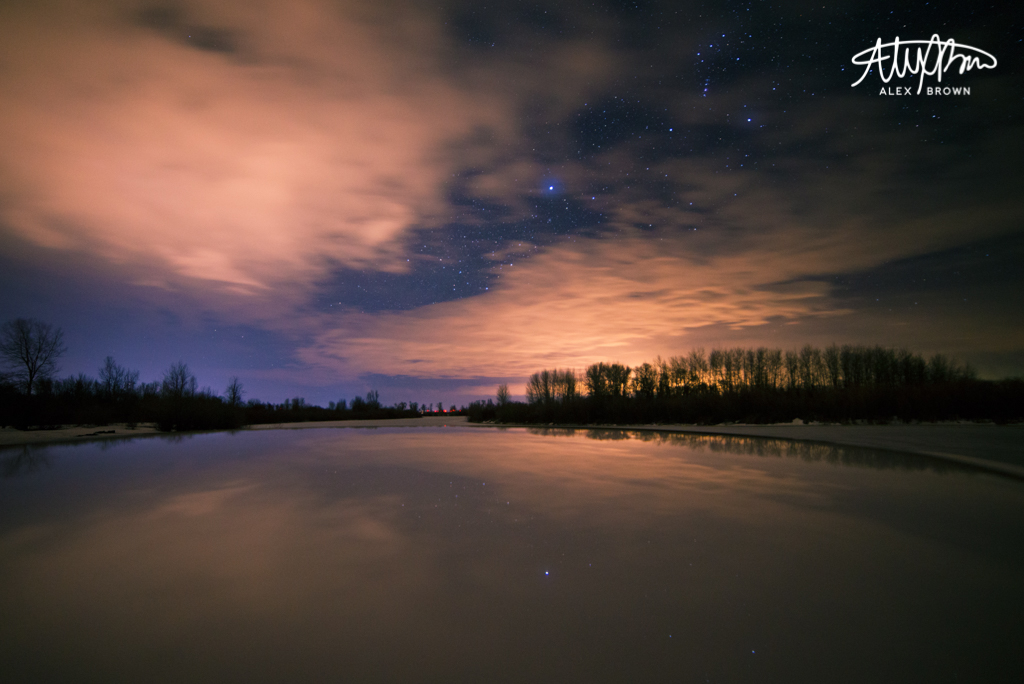
I took this night sky photo about 5-8 miles outside of Rexburg city limits in a local park at around 10:30pm… so not sunset! I love this photo because it showcases one of the most important aspects when it comes to night sky photography: light pollution. Light pollution is the worst enemy to night sky photography (besides thick cloud decks and the moon).
When your camera shutter is open for a lengthy period (15 seconds in this instance), it has all that time to collect the information, light, and create the pixels for the photograph. When combined with a wide aperture (low f/number) and a high ISO, night sky photography often becomes white sky photography, because it’s not only collecting the natural light from the city or the pollutant’s area, you’ve told the camera to add in more light while being more sensitive to light!
The settings for this night sky photograph were ISO 2000, 15 seconds @ f/3.2, 14mm. When I took this picture, I couldn’t figure out where this light source was coming from, but I did know that it was just too bright for my settings, so I adjusted accordingly.
I loved looking at this gallery of Giovanna Griffo’s Incredibly Stunning Night Sky Photography. Think about how much practice and skill it takes when it comes to balancing the light by adding in the foreground elements.
LESSON 2: EDITING THE NIGHT SKY IS REQUIRED.
Key Tip: Use curves in Photoshop or Lightroom to adjust your night sky photograph, bringing out different colors. Go a step further by masking out only certain aspects of the image.
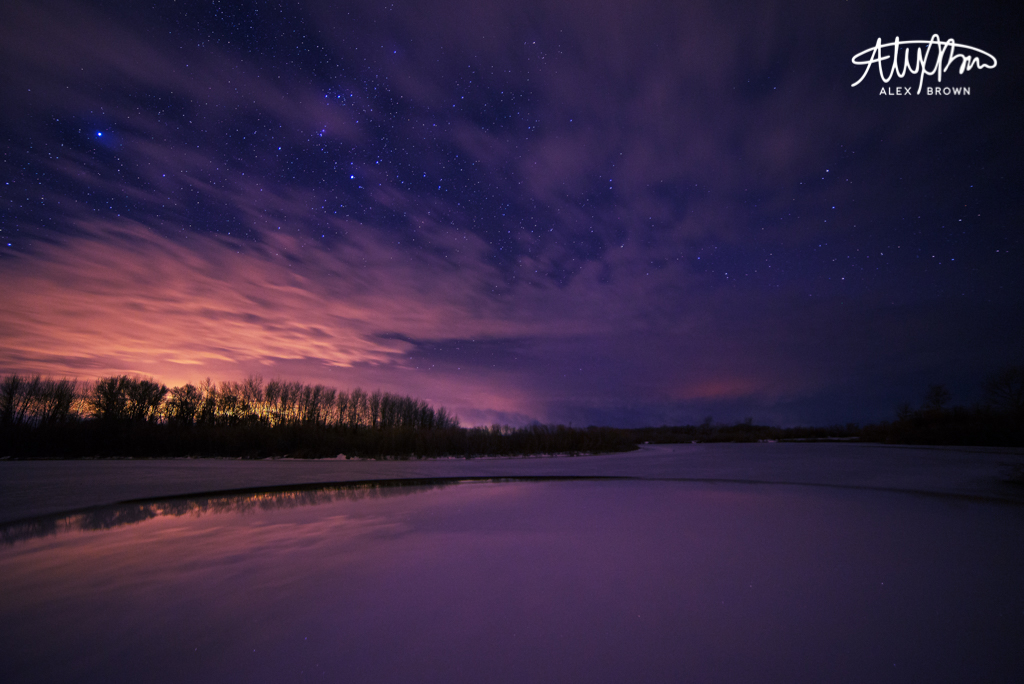
I think the image above is a pretty spectacular night sky photograph on its own. But what if it went on a date and married Photoshop and Lightroom? Well, let’s say that they make good-looking kids.
The first image I showed you was edited “naturally”. This is a term that I personally coined when it comes to night sky photography and basically it means that any edits made – specifically with color – are not as powerful and are more realistic to what the scene was really like. But, it doesn’t hurt to go a step beyond either.
When editing night sky photography, it’s best to use the curves panel and adjustment masks to get color where you want it and when you want it on your image. But don’t just use the RGB curves… use the individual Red, Green and Blue Channel curves when editing night sky photography. Why? It gives you more control over your color and when combined with masks you are able to hide and reveal certain areas of the image. On this picture above, I actually kept the color of the light-polluted clouds from the camera because the transition to the purple hues was less harsh.
LESSON 3: FOCUS ISN’T FREE, IT’S FOUND
Key Tip: It’s okay if you forget to focus ahead of time… just know that it’ll take a bit longer to get a good focus on the night sky. Also, you don’t always have to use a tripod… look for other objects that you can set your camera on that would create and add interest.
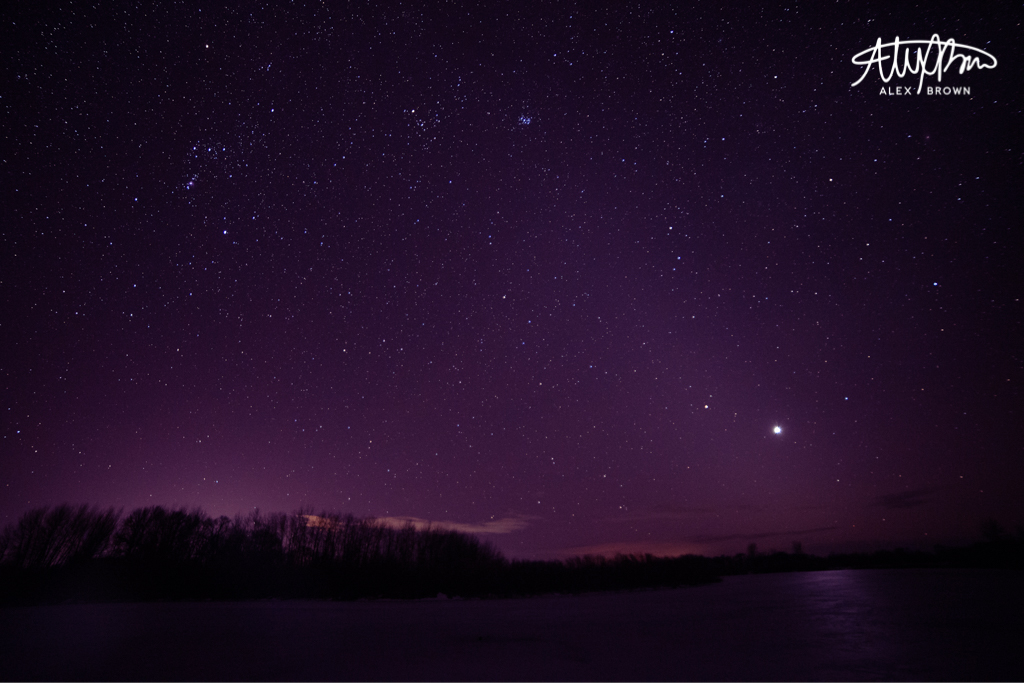
With night sky photography, you don’t necessarily have to use a tripod. For the first two images on this post, I set my tripod on top of my white car. By doing this it gave it a nice surface to reflect off of and it almost looks like it’s a thawing lake. Sorry if I had you fooled.
Having sharp and clear stars is the primary goal of any night sky photographer. While there are different methods on how to properly focus the night sky, my favorite is trial and error. While each camera and lens is different, the best thing is to start with infinity on the focus ring, and work your way until you get nice tack-sharp stars. Once you get that, always remember that because it makes focusing easier on other star trips.
Focusing stars is kind of a two-fold system with night sky photography. The second part of this system is sharpening. Always make sure you sharpen your stars image as it will bring out the detail of even more stars — stars you thought weren’t even in the night sky! But remember… no amount of post-production sharpening can make a blurry image sharp! If you’re a photographer and you’ve never taken a blurry image, I’d love to meet you and learn your secret!
DON’T STOP THE SHUTTER YET…
Here are my other three top picks when it comes to Night Star Photography
Dave Morrow’s Nigh Sky Photo Tutorial on 500px ISO
Alysa Bajenru’s Begginer’s Guide to Night Sky Photography
Popular Photography’s How-To: Shoot Epic Night Sky Landscapes
-CAB
To reveal so many tips is a generous teaching moment. Your photography is amazing. But equal to the photography is your content written with creativity. It doesn’t tell the story. It allows the viewer to live the moment as if they were there. For example ” what if it went on a date and married photoshop with lightroom ……they make good looking kids”. The creative story telling is half the fun for the viewer!
Alex, this is awesome! You really are talented, and you captured some great star shots. I have yet to venture into that area of photography, but need to try it out!! I love the color you added to your image, the purple brings out an entirely different mood!
Check out some more great fine art photography on Channing’s website: http://www.channingrosedesign.com/always-look-for-fine-art-photo-op-stops/
Awesome post man! Your shots are super nice and I liked that you walked through the process.
Ok, I know you already have a few comments on this post but these are amazing! I am for sure going to try your tips! I really want to try some star shots just waiting on a clear night! Good Just you are super talented! You should check out this website all about long exposure photography.
http://www.exposureguide.com/inspiration/incredible-long-exposure-photography-series-entitled-modern-sky-shows/
I have noticed you don’t monetize your page, don’t waste your traffic, you can earn extra bucks every month because you’ve got hi
quality content. If you want to know how to make extra bucks, search for: Boorfe’s tips best adsense alternative